Indoor positioning systems (IPS) are no longer experimental tech. They’re fast becoming a foundational layer for modern logistics, smart buildings, and large venues – enabling real-time asset tracking, indoor tracking, navigation, and spatial intelligence.
In fact, according to Grand View Research the indoor positioning market is projected to reach USD 174.02 billion by 2030.

But while the value is obvious, implementation often isn’t.
Most teams hit roadblocks not because the technology doesn’t exist – but because turning floorplans, hardware, and business goals into a working system is a different game entirely.
At Volpis, we’ve helped clients go from vague ideas and cluttered PDFs to production-ready IPS platforms powering real-time decision-making in complex environments.
In this guide, we won’t waste your time with textbook theory. Instead, based on our experience, we’ll walk through the real process of building an indoor location tracking system that actually works – from defining the use case to choosing the right tech stack, designing the UX, and testing for reliability.
If you’re evaluating IPS for your warehouse, hospital, airport, or smart facility – this is how you get it done.
What is indoor positioning system?
An indoor positioning system (IPS) determines the real-time indoor location of people or objects inside buildings – where GPS is simply unreliable.
Many business owners ask: can GPS work indoors? In practice, the answer is no. This is because satellite signals, which outdoor GPS relies on, are severely attenuated or blocked by building materials, making GPS ineffective for indoor environments.
Even outdoors, as GPS.gov accuracy guidance indicates, GPS isn’t as accurate as most people assume. Under ideal conditions, it delivers around 3 to 5 meters of precision. But in dense urban areas – surrounded by steel, concrete, glass, and signal reflection – that can quickly degrade to 20 or even 30 meters.
Walk through downtown Chicago or central Manhattan, and your blue dot might jump half a block, drift into the wrong building, or spin without warning.
Now take that indoors. In concrete-heavy environments like warehouses, shopping malls, or underground facilities, GPS signals don’t just degrade – they disappear.
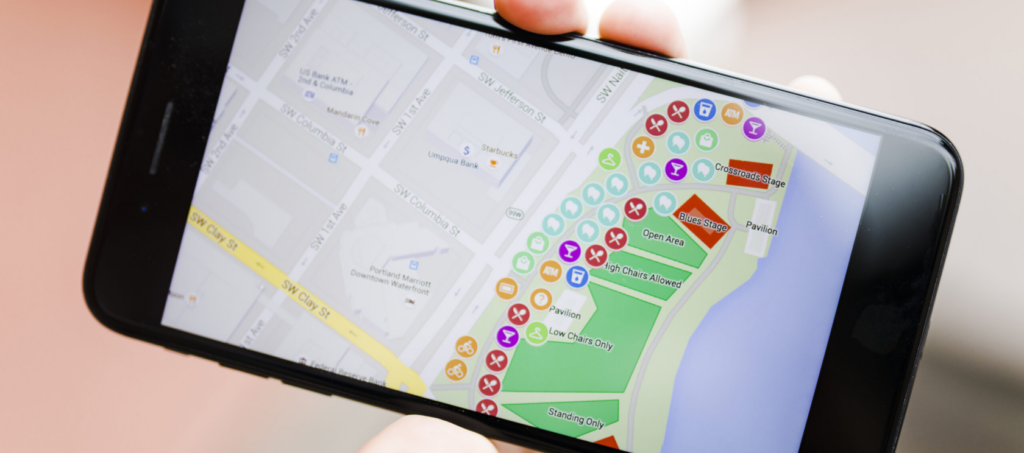
To fill that gap, IPS replaces satellites with localized infrastructure such as Bluetooth beacons, Wi-Fi routers, UWB anchors, or even magnetic field patterns to calculate location with room-level or even sub-meter accuracy. Think of it as the indoor equivalent of Google Maps – but built to handle location tracking inside building environments where GPS fails.
But IPS on its own isn’t enough. To create real value, it has to work in tandem with indoor maps and navigation logic.
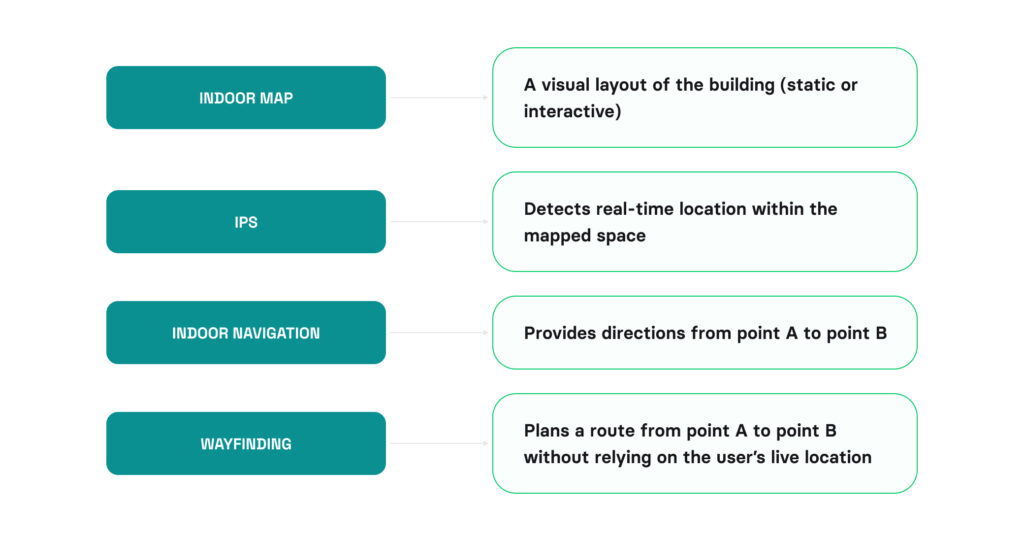
Let’s clear up the confusion. These terms are often used interchangeably, but they solve different parts of the problem:
| Term | What it does | Example use |
|---|---|---|
Indoor map | A visual layout of the building (static or interactive) | Shows store layout or terminal zones |
IPS | Detects real-time location within the mapped space | Locates staff, carts, visitors |
Indoor navigation | Provides directions from point A to point B | Turn-by-turn routing inside a warehouse |
Wayfinding | Plans a route from point A to point B without relying on the user’s live location | Static route from entrance to conference room on a kiosk map |
Indoor positioning systems can serve many goals – from helping visitors find their way in complex venues to improving asset visibility, security, or operational efficiency.
At Volpis, we build integrated systems that combine digitized indoor maps, real-time positioning, and navigation logic into seamless, usable experiences. It’s not about the tech stack – it’s about designing a precise indoor positioning system that actually works in your environment, for your users, and against real business goals.
How does an indoor positioning system work?
An indoor positioning system calculates location using signals from nearby infrastructure – typically Bluetooth, Wi-Fi, or UWB. Instead of relying on satellites, the user’s device picks up signals from known anchor points installed throughout the building and matches them against expected patterns.
Based on signal strength, timing, or proximity, the indoor location system estimates where the person or object is in real time – whether they’re near a loading dock, inside a conference room, or approaching a specific equipment zone.
It’s important to clarify: IPS doesn’t work with Bluetooth or Wi-Fi alone. It requires physical infrastructure – like BLE beacons, UWB anchors, or calibrated Wi-Fi access points – installed at fixed, known locations. These anchors act as reference points, allowing the indoor position tracking system to interpret the user’s position relative to the building’s layout and provide ambient location in real time.
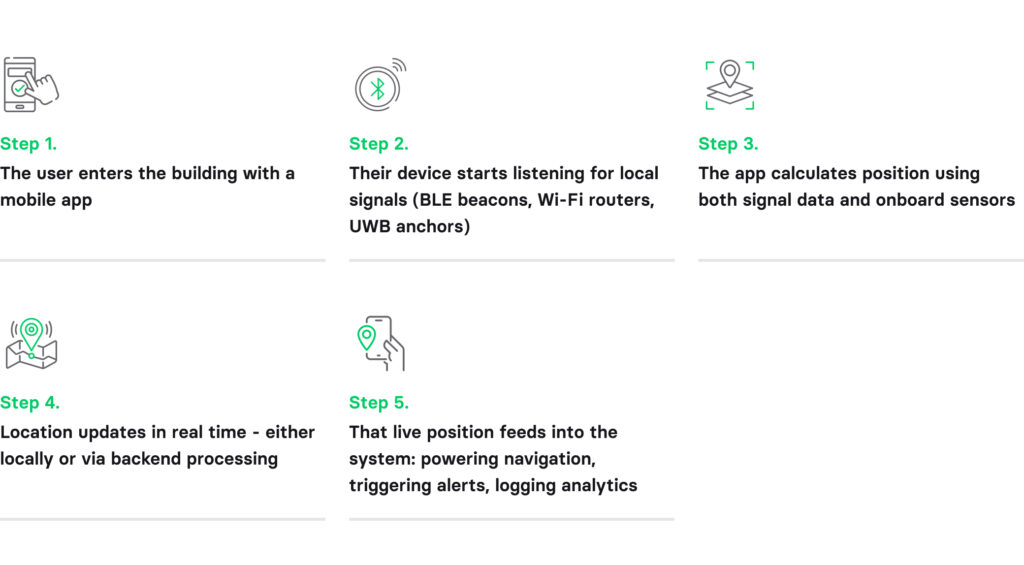
Here’s how that process looks in practice:
- The user enters the building with a mobile app.
- Their device starts listening for local signals (BLE beacons, Wi-Fi routers, UWB anchors).
- The app calculates position. Depending on the setup, the app may combine signal data with onboard sensors, or rely on signals alone.
- Location updates in real time – either locally or via backend processing.
- That live position feeds into the system: powering navigation, triggering alerts, logging analytics.
This process runs continuously, adapting to walls, interference, and movement. At Volpis, we design these systems to prioritize reliability, not just theoretical accuracy – because in real buildings, that’s what actually matters.
How to build an indoor positioning system: a step-by-step process
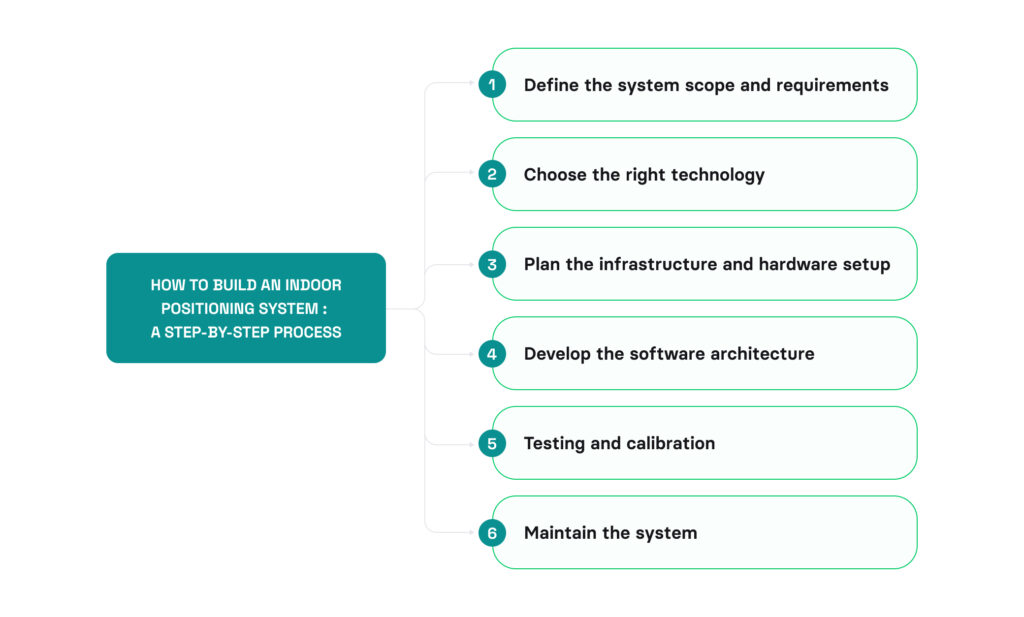
Indoor positioning systems are revolutionizing the way companies manage spaces, offering real-time location insights within structures where traditional GPS falls short. Let’s delve into the step-by-step process of building an IPS for your business.
Step 1: Define the system scope and requirements
The first step in building an indoor positioning system (IPS) is to clearly define the use case and establish the system’s requirements. Before you dive into technology or design, define why you need IPS and what problem it must solve. This prevents you from building features that look impressive but deliver little value.
And here’s how to approach it:
1. Define the core business problem and outcome
Before choosing technology, be clear about the business problem your IPS must solve. A well-defined goal keeps the project focused and avoids “feature creep”..
Ask yourself: What is the single most important outcome this system must reduce, eliminate, or automate?
Some common examples include:
- Operational waste: Time and money lost searching for equipment, vehicles, or inventory.
- Poor user flow: Visitors or patients getting lost, while staff waste time giving directions.
- Compliance gaps: Unauthorized access to restricted zones that compromise safety, security, or data integrity.
Once the challenge is clear, translate it into a specific, measurable outcome. For example:
- “We want to reduce time spent locating forklifts by 80% by knowing their real-time location across the warehouse.”
- “We want to help visitors navigate the hospital independently, using their own smartphones.”
- “We want to prevent staff from entering clean zones unless authorized, by triggering real-time alerts via BLE tags.”
The key is that your goal is concrete, measurable, and tied to a real business pain point – not a vague idea like “improve efficiency.”
2. Define what’s tracked and who uses it
An indoor positioning system is only as effective as its clarity on who and what it serves. The more specific you are, the easier it becomes to design features, select technologies, and stay lean.
Be clear about four things:
- What’s tracked: Decide whether you’re monitoring people, equipment, vehicles, or visitors. Each category has different requirements for accuracy, privacy, and infrastructure.
- How they’re tracked: Choose how location will be captured – via users’ smartphones, BLE/UWB tags, or a combination. The choice affects both accuracy and rollout costs.
- Who consumes the data: Define who will use the data – frontline staff who need real-time alerts, managers who analyze reports, or visitors who need to navigate through the building.
- How they access it: Define the interface – mobile app, web dashboard, or integration into existing ERP/WMS.
If you don’t define these details early, you risk building for “everyone”, and delivering for no one.
3. Define the level of precision needed
Another critical step in scoping your IPS project is defining how precise the tracking must be and how much space the system needs to cover. Not every use case demands centimeter-level accuracy, so avoid over-engineering.
Depending on the use case, accuracy needs usually fall into the following categories:
- Room-level accuracy (3-5 meters): Sufficient for use cases like hospital staff/asset tracking, where it’s enough to know which ward or room someone or something is in.
- Aisle- or sub-meter accuracy (1-3 meters): Required for applications like airport baggage tracking, where indoor positioning must be precise enough to pinpoint items on specific belts or racks.
- High-precision (10-30 centimeters): Needed for autonomous warehouse robots, which depend on centimeter-level positioning to move safely through tight aisles and handle goods with exact accuracy.
Perfect precision is rarely necessary. Instead of over-engineering, define the minimum viable accuracy required to solve your business problem. That benchmark will help you avoid unnecessary costs and choose the right technology for your needs.
4. Prepare a base indoor map
Before any tracking can happen, you need to understand the space. That starts with a digital floor plan – not a polished interactive map, but a clear, structured layout of your environment.
At this stage, your base map should show:
- Building zones and functional areas.
- Entrances and exits.
- Floor levels and vertical connectors (elevators, stairs).
- Key points of interest (equipment rooms, reception areas, restricted zones).
Without this reference, it’s nearly impossible to plan anchor placement, accuracy zones, or signal calibration effectively. Think of the base map as your canvas: you’ll layer infrastructure details onto it later, but the foundation must exist from day one.
Need a step-by-step guide? See our dedicated article: How to create an indoor map.
Start with an MVP, not a full rollout
Don’t try to launch your IPS across the entire facility on day one. Begin with one location, one use case, and one clear outcome – then scale and adjust.
For example:
- Track equipment in a single warehouse zone.
- Pilot wayfinding in just the main entrance wing.
- Test access control in one restricted area.
This approach reduces risk, simplifies your architecture, and delivers faster time to value.
By clearly defining the business problem, what needs to be tracked, who uses the system, how accurate it must be, and preparing a base map, you set a strong foundation for every technical and design decision that follows. This scoping process prevents misalignment later, ensuring your IPS is purpose-built, cost-effective, and tailored to your environment.
If you need expert help with this process – explore our indoor mapping services to see how we can assist with everything from use case definition to full deployment.
Step 2: Choose the right technology
Once you’ve defined the business problem, target users, use case, and minimum viable accuracy, the next critical step is choosing the right technology stack that can actually deliver on it.
Each indoor positioning technology has trade-offs – in accuracy, deployment complexity, and infrastructure cost. Choosing poorly often means overspending on unnecessary precision or ending up with a system that doesn’t meet performance expectations.
Here’s a breakdown of the most commonly used indoor positioning technologies that allow real-time tracking:
1. Wi-Fi fingerprinting
Wi-Fi fingerprinting is a positioning method that leverages existing Wi-Fi infrastructure to estimate a device’s location based on the unique signal strength patterns (fingerprints) from nearby access points. Instead of relying on direct signal triangulation, Wi-Fi fingerprinting creates a signal map during an initial calibration phase, where each spot in the building is associated with a unique combination of access point signal strengths. At runtime, a device’s live signal pattern is compared against this map to determine position.
With proper calibration and access point density, accuracy typically ranges between 5–15 meters, though performance varies with building layout and RF conditions. Thanks to its ability to reuse enterprise Wi-Fi networks, this method is especially popular for asset tracking, indoor analytics, and large venues that already maintain dense Wi-Fi coverage.
Installation requirements
To make Wi‑Fi fingerprinting work reliably, several technical components and setup steps are required:
- Wi-Fi Access Points (APs): At least 3–4 access points are required per zone, with more needed for higher accuracy. Most systems reuse existing enterprise APs (e.g., Cisco, Aruba). For best results, install access points at a height of 2–3 meters, spaced 15–30 meters apart, and positioned in corners or along hallways to maximize coverage and reduce signal obstruction.
- Calibration: Manual site surveys are required to collect fingerprints across the venue. Recalibration is needed periodically (especially in dynamic RF environments).
- Mobile/Web: Can work via mobile SDKs or with Wi‑Fi-enabled tracking tags.
- Backend: Required for storing the signal map and processing real-time positioning.
Wi-Fi fingerprinting costs
While Wi‑Fi fingerprinting can leverage existing infrastructure, there are still some cost components to consider:
Access Points (reuse or upgrade) – ~$100–$300 per AP – enterprise-grade hardware if upgrades are needed.
Although reusing infrastructure helps reduce hardware costs, the need for calibration and upkeep means the total Wi‑Fi fingerprinting cost may exceed BLE in the long term.
Wi-Fi fingerprinting advantages and limitations
Like any IPS technology, Wi‑Fi fingerprinting comes with both strengths and trade-offs. Here’s a summary of key advantages and limitations to consider:
Advantages:
- Leverages existing infrastructure: Often reuses enterprise-grade Wi‑Fi networks already deployed across the facility.
- Covers large areas efficiently: Provides wide coverage with fewer additional devices compared to BLE or UWB.
- Device flexibility: Supports both smartphones and Wi‑Fi-enabled tracking tags.
- App-free tracking (in some cases): Certain use cases can operate without a dedicated mobile app, reducing user friction.
Limitations:
- Lower precision: Typically delivers less accurate positioning than BLE or UWB solutions.
- Device variability: Performance may vary across different operating systems, Wi‑Fi chipsets, and device manufacturers.
- Deployment complexity: Setup and testing are more complex compared to simpler anchor-based solutions.
When to consider Wi‑Fi fingerprinting: A cost-effective option for large indoor areas with existing Wi-Fi infrastructure. Ideal for analytics, visitor insights, and broad asset visibility, when centimeter level accuracy isn’t required.
2. Bluetooth Low Energy (BLE)
BLE is one of the most widely used indoor positioning methods, valued for its low cost, ease of setup, and compatibility with smartphones. It determines device location using small, battery-powered beacons placed across a venue, each continuously emitting Bluetooth signals at regular intervals. Nearby smartphones or dedicated receivers detect these signals and measure their strength (RSSI – Received Signal Strength Indicator) to estimate proximity.
In multi-beacon environments, the system can apply trilateration (calculating distances from multiple beacons) or fingerprinting (comparing signal patterns against a pre-mapped layout) to derive position. With proper beacon placement and calibration, BLE typically delivers 1–5 meter accuracy, which is sufficient for most tracking and navigation scenarios.
Since the positioning logic usually runs directly on the user’s smartphone, BLE is particularly effective for visitor-facing applications like indoor navigation in malls or hospitals, staff/equipment tracking in clinics or campuses, and proximity-triggered content in retail or museum settings.
Installation requirements
BLE is relatively easy to deploy, but achieving consistent accuracy requires thoughtful planning around beacon placement, calibration, and user interface design. Here are the key components:
- Beacon placement: BLE beacons should be installed every 5–15 meters, depending on venue size and accuracy needs. In high-traffic or precision-critical areas (like entrances or tight corridors), they should be placed more densely to avoid signal blind spots. Mount beacons at a height of approximately 2 meters to ensure optimal signal propagation.
- Power supply: Most beacons are battery-powered (coin-cell batteries lasting 1–3 years).
- Calibration: An initial setup phase is required to fine-tune signal thresholds and validate trilateration or fingerprinting logic. Recalibration is needed if the environment changes.
- End-user interface: Usually relies on a mobile app that receives BLE signals and visualizes position on a digital indoor map. Apps must be configured to scan BLE signals in the background and interpret proximity or location zones.
BLE positioning cost
One of BLE’s biggest advantages is its relatively low total cost of ownership. While you’ll need multiple beacons to cover the space, the hardware itself is inexpensive, and setup can be done quickly without deep technical expertise.
Beacon hardware – ~$10–25 per device – varies by brand, power source, and form factor.
Note: Installation costs typically cover more than just signal tuning – they include technician labor, site walkthroughs, beacon mounting, and initial calibration efforts.
BLE advantages and limitations
BLE has its own strengths and operational challenges. It stands out for cost efficiency and mobile-friendliness, but achieving consistent accuracy still requires thoughtful planning and upkeep. Below is a breakdown of the most relevant pros and cons:
Advantages:
- Broad mobile compatibility: Works with most iOS and Android smartphones without requiring specialized hardware.
- Cost-effective: Hardware and deployment costs are relatively low compared to UWB or complex Wi‑Fi setups.
- Offline-capable: BLE beacons operate without an internet connection, ideal for isolated or secure environments.
- Scalable: Easily scales to cover large venues like malls, hospitals, or campuses.
- Rich SDK ecosystem: Supported by mature SDKs and vendor platforms (e.g., Estimote, Kontakt.io).
Limitations:
- Accuracy depends on layout: Beacon density, wall materials, and interference can affect positioning precision.
- Ongoing tuning required: Regular calibration is needed to maintain accuracy over time.
- No built-in floor detection: Additional logic or hardware is required for multi-floor environments.
- Requires mobile app: Most use cases rely on users having a dedicated app installed.
- Signal distortion: Performance may degrade in environments with heavy glass, metal, or reflective surfaces.
When to consider BLE: Ideal for projects that need fast, cost-effective deployment across smartphones – especially in retail, healthcare, or public venues. Expect good performance in the 1–5m range, but factor in calibration needs, signal tuning, and user reliance on mobile apps.
3. Ultra-Wideband (UWB)
UWB is a high-precision indoor positioning technology that determines location based on the time it takes for radio signals to travel between devices. Unlike BLE or Wi-Fi, which estimate distance from signal strength, UWB leverages time-of-flight (ToF) and angle-of-arrival (AoA) techniques to measure both distance and direction with exceptional accuracy.
In practice, UWB relies on compact, battery-powered tags that emit very short radio pulses across a wide spectrum. Fixed anchors installed throughout the venue detect these pulses, recording their arrival time and, in some cases, the incoming angle. By combining these measurements, the system can pinpoint a device’s position with 10–30 cm precision, even in challenging environments.
Thanks to its precision timing and wide bandwidth, UWB is far more resilient to reflections and obstructions than BLE or Wi-Fi. This makes it the technology of choice for mission-critical use cases where real-time, centimeter-level accuracy is non-negotiable, such as robotics, AGV navigation, safety zones, or high-value asset tracking in factories, hospitals, or logistics hubs.
Installation requirements
While UWB offers industry-leading precision, it requires a well-planned infrastructure to perform effectively. Compared to BLE or Wi‑Fi-based systems, UWB installation involves more specialized hardware and upfront configuration. Here’s what a typical setup includes:
- Anchors: Requires at least 2–4 UWB anchors per standard coverage zone (around 100–200 m²). For 3D positioning or multi-floor setups, additional anchors are necessary to maintain accuracy across vertical space.
- Tags: Users or assets must carry UWB-enabled devices, such as badges, wristbands, or compact asset trackers, that communicate with the anchors.
- Controller/Gateway: Many deployments include a central controller or gateway device to synchronize anchors, process positioning data, and route it to backends or third-party platforms.
- Mobile: Not typically supported on mobile devices, so most implementations rely on dedicated tags.
UWB positioning costs
Ultra-wideband systems typically require a larger initial investment than BLE or Wi‑Fi-based setups. However, the payoff comes in the form of unmatched accuracy and long-term reliability – especially for mission-critical environments like warehouses, factories, or high-security facilities.
UWB Anchor – ~$200–$500 per unit – price varies by brand, range, and power options.
UWB Tag – ~$30–$100 per device – depends on form factor (badge, wristband, tracker).
UWB advantages and limitations
UWB offers unmatched accuracy and strong reliability in complex indoor environments, but those benefits come with trade-offs in cost and complexity. Below is a summary of where UWB excels, and what to plan for:
Advantages:
- High precision: Delivers real-time precision within 10–30 cm – ideal for high-stakes environments like factories, hospitals, or robotics labs.
- Strong interference resistance: Performs well even in metallic or cluttered environments where BLE or Wi‑Fi often struggle.
- Stable performance: Resistant to multipath effects and RF noise, enabling consistent results across changing conditions.
- Long-lasting tag battery: Most UWB tags last 1–3 years on a single charge, reducing maintenance effort.
Limitations:
- Higher upfront cost: Hardware and installation are significantly more expensive than BLE or Wi‑Fi solutions.
- Limited smartphone integration: Only a few smartphones support UWB, making it unsuitable for bring-your-own-device (BYOD) models.
- Requires full hardware stack: Both fixed anchors and mobile UWB tags must be deployed – no reuse of existing infrastructure.
- Complex installation: Setup demands careful planning, synchronization, and calibration, especially for multi-floor or 3D tracking.
When to consider UWB: UWB is the right choice when you need ultra-high precision (10–30 cm), real-time responsiveness, and reliability in complex environments – such as warehouses, factories, hospitals, or robotics labs. Just keep in mind: UWB requires dedicated infrastructure and tags, so it’s better suited for controlled enterprise environments than consumer-facing apps.
Comparing indoor positioning technologies
With so many available indoor positioning technologies, choosing the right one depends on your environment, accuracy needs, infrastructure constraints, and budget. The table below summarizes key characteristics of each IPS option discussed above – including accuracy, cost, infrastructure needs, and typical use cases – to help you make an informed decision.
| Technology | Accuracy | Range | Requires Infrastructure | Cost | Real-Time Tracking | Ease of deployment |
|---|---|---|---|---|---|---|
UWB | 10–30 cm (high) | 10–50+ meters | Anchors + Tags | High | Yes | Complex – needs fixed anchors at known positions, power supply or PoE, clear line-of-sight; intensive calibration and sync |
BLE | 1-5 meters | ~30–50 meters | Beacons | Medium | Yes | Moderate – requires manual beacon placement (walls/ceilings), battery-powered or wired; calibration via signal mapping |
Wi-Fi RTT | 5-15 meters | ~25–30 meters | Access Points | Medium | Yes | Very Easy – often no new hardware needed; relies on existing Wi-Fi; requires software-based fingerprinting or calibration |
There’s no one-size-fits-all solution when it comes to indoor positioning. Each technology comes with its own strengths, limitations, and trade-offs – and the best choice depends on your venue, goals, user behavior, and budget. For some projects, a single technology like BLE may suffice. For others, the real value lies in combining multiple layers – for example, using Wi-Fi for broad coverage, and UWB for precision.
Carefully evaluate your technical constraints, deployment timeline, and user expectations. And remember: the smartest IPS strategies don’t chase features – they align with real-world use cases.
Step 3: Plan the infrastructure and hardware setup
Once you’ve selected the right positioning technology (or combination of technologies), the next step involves planning the infrastructure and selecting the appropriate hardware. This includes identifying key points of reference (e.g., beacons, access points), determining coverage areas, and selecting the necessary devices. Proper planning ensures that the system meets the accuracy requirements and functions effectively within the intended environment.
Next, align your infrastructure to the building type and use case. A hospital requires room-level precision with minimal signal interference. A logistics warehouse demands coverage over open spaces with metal shelving. A museum may face RF attenuation from thick walls, while an airport needs near-real-time tracking at scale. Each environment comes with distinct constraints, and your hardware setup must adapt accordingly.
Tips for reference point placement
Before you install, treat anchor and beacon placement as a design problem, not just a technical task. Placement decisions directly impact your IPS accuracy, coverage, and long-term maintenance. Here are key principles to guide your setup:
- Cover what matters. Break down your building or venue into logical zones based on user flows, access needs, and environmental constraints. Place anchors or beacons near entrances, corridors, high-traffic zones, and key assets – not just for coverage, but for context. Depending on the space, consider whether ceiling or wall-mounted placement provides better visibility, protection, and tamper-resistance.
- Avoid signal dead zones. Long corridors, elevators, and dense shelving can block or reflect signals. Add redundancy in these areas to prevent gaps in coverage.
- Respect physical barriers. Materials like reinforced concrete, metal, or even glass can degrade signal strength. Account for wall density and floor height when estimating anchor range.
- Aim for line-of-sight – but be pragmatic. Especially with UWB and BLE, signal clarity improves dramatically when devices aren’t blocked by furniture, walls, or people.
- Balance density and budget. More anchors generally mean better accuracy – but also higher costs and maintenance. In many cases, a smartly optimized layout outperforms a dense but unplanned one.
- Plan for maintenance and scaling. Make sure devices can be accessed later for battery swaps, firmware updates, or re-calibration.

“We’ve seen positioning accuracy jump from ±5m to under 1m in the same building – just by rethinking anchor placement. It’s not only where you put them, but how well placement matches behavior patterns and signal flow.”
– Yurii, lead iOS developed
Create an IPS hardware inventory list
Once the design is set, build a hardware checklist to keep your deployment organized. List everything you’ll need to procure or reuse:
- Number of anchors/readers/tags by zone.
- Mounting accessories (e.g., brackets, enclosures).
- Power/network cables or batteries.
- Admin devices (tablets, smartphones, scanners).
Use this list to budget, order, and prepare installation kits for each zone.
Your infrastructure is the backbone of your IPS, and getting it right early saves time and frustration down the line. Treat this phase like laying the foundation for a smart building: precise, intentional, and adapted to real-world behavior. In the next step, we’ll cover how to build the backend logic that brings this infrastructure to life.
Step 4: Develop the software architecture

Indoor positioning doesn’t stop at hardware – that’s just the foundation. The real intelligence lies in how your system interprets, processes, and responds to positioning data.
This step is about building the software brain of your IPS: the layers that turn signal inputs into actionable logic, visual maps, and seamless user experiences.
Below, we’ll break down the essential software components every IPS stack should include.
1. Signal acquisition & Filtering layer
This layer is the first step in transforming hardware signals into meaningful location estimates. Whether you’re working with BLE, Wi-Fi, UWB, or hybrid setups, the raw data that comes in is often noisy, erratic, and affected by real-world interference. Without cleaning and filtering, the result is jittery blue dots and frustrated users.
Key techniques for reliable signal processing:
- Use smoothing algorithms: Apply techniques like Kalman filters, Exponential Moving Averages, or Particle filters to stabilize signal readings and reduce noise. This is especially important in environments with dynamic interference – such as people moving around, metal racks reflecting signals, or devices shifting orientation.
- Stabilize your sampling window: Instead of reacting to every signal spike or dip, implement a time-based sampling window and set minimum signal thresholds. Techniques like signal debouncing and windowed averaging help you detect consistent patterns, not just noise. This results in smoother movement and fewer false location updates.
- Consider sensor fusion: Combine signals from multiple tech layers to improve accuracy when the environment is unpredictable or coverage is sparse.
Many positioning issues stem from skipping this layer. Even the best algorithm can’t perform well on raw, unstable input. Clean data in – accurate position out.
2. Location engine layer
This is the computational core of your indoor positioning system, where raw signals are transformed into live coordinates, zone entries, or presence events. Your choice of algorithm shapes everything from accuracy and latency to how well the system scales across multiple buildings or user types.
Here are the core methods you’ll encounter:
- Trilateration / Multilateration: Used in UWB and BLE systems. This method calculates the position based on the distance between a device and multiple fixed anchors. Multilateration, which relies on the time difference of arrival (TDoA) is more precise, especially in UWB systems where time-of-flight (ToF) can be measured accurately.
- Fingerprint matching: Used in Wi-Fi, magnetic field, or BLE RSSI-based systems. It compares live signal patterns to a pre-recorded signal map (the “fingerprint”). Effective in static environments but needs recalibration as conditions change.
Once you’ve chosen your method, design the engine for long-term adaptability. Here are a few practical tips to guide your architecture decisions:
- Design for modularity: Build the location engine as a standalone layer. This makes it easier in future to swap algorithms, tune accuracy levels, or integrate advanced techniques like sensor fusion or ML, without overhauling your entire app.
- Choose the right processing mode: Real-time processing is best for live navigation and turn-by-turn guidance, but it needs more system resources. For scenarios like event logging or analytics, batch processing offers a lower-cost, lower-latency alternative.
- Plan for hybrid logic in complex spaces: In environments like hospitals, airports, or industrial facilities, no single positioning method is foolproof. Combine BLE proximity for responsiveness, Wi-Fi fingerprinting for redundancy, and inertial sensors (like gyroscopes and accelerometers) for continuity when signals drop.
With a well-structured location engine in place, your system can now translate coordinates into meaningful actions.
3. Application layer
This is the front-facing layer where IPS becomes visible. It’s where spatial data transforms into maps, alerts, and dashboards that people actually use. A well-designed application layer doesn’t just display data – it makes it actionable and role-specific.
Here are some core UI elements that appear in most IPS-powered applications:
- Live map overlays: Display real-time device positions over floor plans, often enriched with movement trails, zones, and status icons. They’re essential in environments like hospitals, warehouses, and airports where spatial visibility drives decisions.
- Search and replay tools: Let users look up specific devices, people, or time windows – helpful for audits, incident reviews, or workflow analysis.
- Zone-based events and alerts: Trigger predefined actions when a device enters or exits a zone (e.g., staff notifications when a patient leaves a ward or a vehicle enters a restricted bay). These can be real-time or batched.
- Analytics dashboards: Aggregate and visualize movement patterns, zone dwell times, bottlenecks, and utilization. Helps optimize layouts, staffing, and operations.
Designing this layer isn’t just about visuals, it’s also about making the right strategic choices to deliver value across roles and use cases. Here are a few key decisions to guide your UX and architecture:
- Choose the right platform(s): Decide whether you need a mobile app, a web dashboard, or both. Real-time mobility may be critical for on-the-ground staff, while desktop tools may better serve analysts or supervisors.
- Balance latency and fidelity: Aim for real-time updates (e.g., every 1–3 seconds) where needed, but don’t overload your backend. Fine-tune the refresh rate to match user expectations without wasting bandwidth or compute.
- Design around user roles: A nurse, a warehouse manager, and a security officer don’t need the same data. Tailor interfaces based on context, with role-specific dashboards, permissions, and task-focused views.
- Get spatial UX right: Use clean floor plans, clear icons, and smart layering. Avoid clutter, even accurate positioning becomes useless if users can’t quickly interpret what’s on the screen.
No matter how accurate your positioning engine is, its impact depends on what the user sees. The application layer is where IPS becomes real – guiding actions, informing decisions, and delivering measurable value. Design it with purpose, tailor it to roles, and keep clarity at the core.
4. Data layer
This is the backbone that gives your indoor positioning system long-term value. While the application layer handles what users see in real time, the data layer preserves everything that happens, allowing you to analyze behavior, reconstruct sessions, trigger downstream workflows, and meet regulatory or operational requirements.
A well-designed data layer doesn’t just log events – it transforms raw signals into operational and strategic insight. Here’s what that entails:
- Time-series storage: Record every location update – timestamped, device-tagged, and coordinate-based – in a format optimized for chronological queries. Time-series databases (e.g., InfluxDB, TimescaleDB) are often used for this kind of chronological, high-volume write-heavy data.
- Session tracking & path reconstruction: Track user/device sessions over time, enabling replay of movement histories, dwell time analysis, or anomaly detection.
- Event logging: Zone entry/exit, alert triggers, signal drops. These logs are critical for both real-time responses and retrospective troubleshooting.
- Data export & BI integration: Enable exports to CSV, integration with BI tools (like Power BI, Looker, Tableau), or direct APIs for ERP/WMS systems. This supports visualizing heatmaps, traffic flows, resource utilization, and more.
To design a data layer that supports both real-time performance and long-term value, keep these architectural principles in mind:
- Retention strategy: Define what stays and for how long. Store raw high-frequency data for a limited time, but keep aggregated insights for long-term analysis. For example, hospitals or government buildings may require multi-year retention for audit or legal compliance.
- Data model design: Structure your storage for flexible querying – by device, location, session, or time window.. Consider indexing strategies and tradeoffs between write speed and read complexity.
- Privacy & compliance: For sensitive environments (e.g., healthcare) data security is non-negotiable. Encrypt stored data, apply access control policies, and follow data minimization principles – only collect what’s truly needed.
- Scalability planning: Plan for data growth. Even a mid-sized hospital can generate millions of location points monthly. Choose scalable storage and think about partitioning strategies early to avoid slowdowns later.
The value of your indoor positioning system compounds over time – but only if the data layer is built with foresight. Don’t treat it as an afterthought. It’s what turns fleeting signals into lasting insight, regulatory confidence, and operational clarity.
SDK-based solutions
If building a full indoor positioning architecture from scratch feels too complex or time-intensive, SDKs offer a faster route. These software development kits bundle positioning algorithms, APIs, and backend services into ready-to-integrate modules, helping you launch faster while sidestepping many infrastructure hurdles.
SDK-based systems can drastically reduce development time for MVPs or pilot deployments, especially when precision or scalability is not your top priority.
Here’s a quick comparison of popular IPS SDKs:
| SDK | Technologies | Features | Best for |
|---|---|---|---|
AtlasSDK | Wi-Fi, BLE, UWB | High-accuracy positioning (up to 10 cm with UWB), multi-sensor support, APIs for integration | Large-scale projects needing high precision (e.g., hospitals, airports |
Mist SDK | BLE and Wi-Fi | Real-time updates, geofencing, cloud management | Corporate offices, retail environments, and convention centers |
These SDKs offer speed and simplicity, but trade off some flexibility and control. You won’t fully own the positioning logic or tuning – which may be limiting in highly custom or security-sensitive environments.
When to choose an SDK-based approach
SDKs can accelerate early-stage development, but they’re not always the right fit. The decision depends on your goals, resources, and how much control you need over the positioning logic.
An SDK-based approach works best when:
- You’re building a proof-of-concept or MVP and need to validate it quickly.
- Your team lacks the time or expertise to implement the entire signal processing and location engine stack from scratch.
- Your environment fits well with the SDK’s existing calibration models (e.g., BLE-ready retail spaces or Wi-Fi-enabled venues).
Developing a robust software architecture is essential for integrating all hardware components, processing location data efficiently, and providing a user-friendly interface. Whether you build it from the ground up or integrate an SDK, remember: accuracy starts with clean input, but true value lies in what you do with the output.
Step 5: Testing and calibration
Even the best-designed indoor positioning systems need real-world validation. Walls, interference, and dynamic movement introduce variables that no simulation or lab model can fully predict.
Testing and calibration are the steps that ensure your IPS delivers on its promises of accuracy, responsiveness, and reliability.
Here’s how to approach it with a methodical, scalable process:
1. Setting up test scenarios
Staged testing.
Instead of diving headfirst into a full-scale deployment, start with a controlled rollout. This lets you validate the IPS under real conditions, catch environmental quirks early, and make adjustments before they become costly. Begin in a lab, expand to a small pilot, and only then move to full production:
- Lab testing: Begin in a controlled space (e.g. a small room or test zone). This allows engineers to debug core functionality (signal reception, positioning logic, UI updates) without the chaos of a live environment.
- Pilot deployment: Roll out the IPS in a limited real-world area, for example, one hospital wing or one level of a shopping mall. Involve a limited group of test users and closely monitor feedback, system behavior, and accuracy.
- Tuning before scale: Based on pilot feedback, adjust beacon placement, tweak algorithm parameters, or reconfigure signal power levels. Only when these refinements meet your performance targets should you proceed to a full rollout.
A staged rollout helps you catch hardware gaps, environmental edge cases, and UX friction points before they affect your entire user base.
Once your pilot is in motion, it’s time to put the system’s accuracy to the test, not just in ideal conditions, but across varied real-world scenarios. Your goal isn’t just to prove it works, but to measure how reliably and precisely it performs under stress.
Start by verifying that location estimates are both precise and repeatable:
- Static accuracy: Place devices at marked positions and compare real-world vs. estimated coordinates. Calculate average error in meters.
Dynamic path testing: Have a person walk predefined routes and evaluate if the system tracks their path correctly, especially in corners, staircases, or across floor transitions. - Zone validation: Test across different building areas – near windows, elevators, restrooms, high-interference spots. Document where positioning drifts beyond tolerance.
Set a clear success threshold – e.g. “95% of readings must be within 1.5m accuracy” – and test against it. This gives stakeholders clarity and provides a benchmark for future performance monitoring.
After validating accuracy, shift focus to how fast and reliably the system responds in real-world use. Real-time indoor navigation hinges not just on precision, but on timeliness and consistency, especially under load.
Check these benchmarks:
- Update frequency: How often does the user position refresh? BLE-based setups might refresh every 1–2 seconds; UWB can support 10+ updates per second.
- Latency: How long between a physical movement and its reflection in the app? Aim for sub-1-second latency in real-time navigation use cases.
- Peak load simulation: Activate many devices simultaneously to stress-test the system. Measure performance under strain: CPU/memory usage, dropped signals, system crashes, or lag spikes.
Also evaluate dead zones and failure points, such as elevators, metal structures, or areas near dense machinery, and flag them for redesign or recalibration.
Accuracy is only half the story. You’re not just building a positioning engine, you’re building a product. Test it like your users would:
- App responsiveness: Does the app launch quickly? Does the map pan/zoom smoothly? Does the blue dot move fluidly or jitter across the screen?
- Map legibility: Are floor plans clear on all screen sizes? Are POIs labeled well? Is the orientation arrow intuitive and responsive?
- Search & routing: Can users easily find destinations using partial matches (e.g. “Conf Rm A” vs. “Conference Room A”)? Do routes avoid inaccessible or staff-only areas?
- User walkthroughs: Have real users (ideally unfamiliar with the building) try navigating from point A to B. Did they feel guided? Or confused?
Don’t forget device testing across OSs and screen sizes. A beautiful Android experience that fails on iPhone is a dealbreaker.
2. Calibration procedures
Once your system is running in a real environment, you’ll start capturing signal behaviors that no lab test could reveal. This is your chance to fine-tune the IPS for maximum precision:
- Signal tuning: Identify weak coverage areas and reinforce them – either by adding extra beacons or adjusting signal power to prevent overlap and interference.
- Fingerprint enhancement: If using fingerprinting, revisit weak zones and collect denser signal data for improved matching.
- Algorithm adjustments: Tweak filter strength, sensor fusion weight, or smoothing levels.
Treat every adjustment like an experiment: change one thing at a time, rerun your test cases, and measure the results. Iterative calibration keeps your system sharp, and keeps error from creeping back in.
Even a well-calibrated IPS won’t stay perfect forever. Buildings change. Hardware evolves. Signal environments shift. To maintain accuracy over time, you need to recognize when recalibration is no longer optional – but essential.
Watch for these common triggers:
- Physical layout changes: Renovations, new walls, shelving, or even large holiday displays can alter RF paths and distort positioning.
- Hardware modifications: Moving a beacon, replacing batteries, or adjusting access point positions all introduce potential drift.
- Performance degradation: Sudden increases in latency, accuracy loss, or rising user complaints should prompt a system check.
- Firmware updates or interference changes: New Wi-Fi networks or changed RF environments can quietly degrade performance.
Testing and calibration are what turn a prototype into a production-ready IPS. By following a staged rollout, validating accuracy and latency under real conditions, refining the UX, and planning for long-term maintenance, you build confidence in your system’s performance.
Step 6: Maintain the system
Designing and testing an IPS is only half the journey. Real value comes from how reliably it performs after launch. A strong deployment strategy ensures accuracy from day one, while proactive maintenance keeps performance consistent as the environment evolves.
1. Deployment steps
Rollout starts with translating your tested setup into the live environment. Follow the finalized infrastructure plan to ensure consistent coverage and signal quality across all zones. Once installed, verify that each anchor or beacon operates correctly, then shift focus to continuous monitoring and maintenance.
2. Monitoring performance
Getting the system up and running is only the first milestone. The real challenge is keeping it accurate and reliable as the environment changes. That’s where continuous monitoring comes in:
Real-time monitoring: Implement continuous monitoring through a central dashboard that tracks system health, device uptime, and accuracy metrics.
Recalibrate as needed: Recalibrate if accuracy decreases due to changes in the environment, like new shelving, remodeled layouts, or updated Wi-Fi networks.
3. Maintenance practices
IPS hardware and software both require preventative care. Regular checks reduce downtime and keep the system dependable:
- Battery and power upkeep: Replace beacon batteries or check power sources on a set schedule to prevent sudden failures.
- Firmware and software updates: Keep algorithms, SDKs, and backend systems up to date to benefit from performance improvements and security patches.
- Scalability planning: Periodically reassess if anchor density, server capacity, or app performance still meet demand as user volume grows.
One important lesson we’ve learned while building indoor positioning systems is the effect on battery life. It is crucial to use optimization tools and best practices to minimize energy consumption. This includes leveraging low-power location modes when possible, batching location updates, reducing scan frequency, and carefully managing background activity. Proper optimization not only preserves battery life but also ensures a smoother user experience.
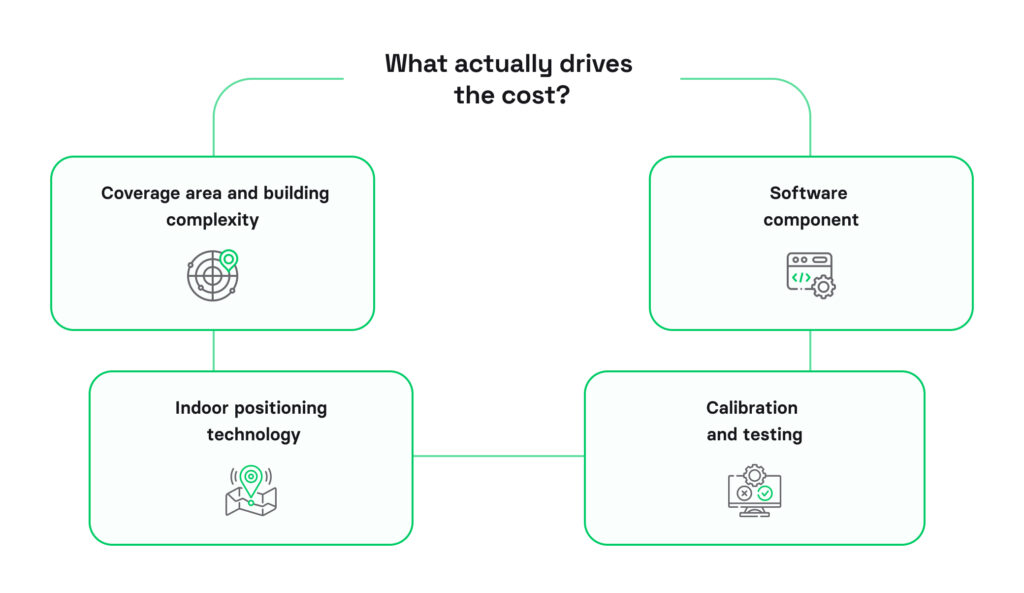
Indoor positioning system cost breakdown for 2026
Based on what we see across the industry, a full-scale indoor positioning system costs typically starts from $20,000. That includes everything from infrastructure and installation to backend logic and mobile app integration. For larger, multi-floor or multi-building environments, the indoor positioning price can scale well beyond that.
There’s no one-size-fits-all answer – and any company that quotes a flat rate is either guessing or selling something off the shelf.
But the real number depends on one thing: what you’re trying to solve.
What actually drives the cost?
1. Coverage area and building complexity
Tracking a single retail floor is not the same as building a system for a multi-floor hospital, an airport terminal, or a logistics hub with concrete walls and poor connectivity. The larger and more complex the space, the more infrastructure you’ll need – and the more tuning it takes to get right.
2. Indoor positioning technology
- BLE (Bluetooth Low Energy) is relatively affordable. Beacons range from $10–$25 each, and a mid-sized facility might need 40–100 units.
- UWB (Ultra-Wideband) delivers higher indoor positioning system accuracy, but the hardware is more expensive ($200–$500 per anchor, or $30–$100 per tag), and often requires wired infrastructure.
- Wi-Fi Fingerprinting uses existing routers but requires signal mapping. On average, the price per AP ranges from $100–$300. Though Wi-Fi positioning system accuracy is limited, it remains one of the most cost-effective options for large venues with existing infrastructure.
3. Software component
IPS is more than just signal detection. You’ll need an app that translates coordinates into a usable experience: positioning overlays, turn-by-turn directions, alerts, or analytics dashboards. And on the backend, you’ll need logic to process the data, store location events, and integrate with your systems.
4. Calibration and testing
The most overlooked and underestimated part of the budget. In some cases, these processes may take approximately 10-20% of the development time. Positioning only works if it’s tuned to your space. That means real-world testing, floor-by-floor calibration, and continuous optimization.
Challenges in implementing IPS & how to overcome them

Most indoor positioning systems don’t fail because the technology is immature – they fail because someone skipped the basics. Wrong assumptions early on. No connection to business goals. Poor environmental planning. Inconsistent UX. No calibration process.
We’ve been brought in to fix more than a few of these.
Here’s what usually goes wrong – and how to prevent it before it costs you time, trust, or budget.
1. Strategic mistakes (these break the entire project)
Pitfall: Choosing a technology before defining the problem
We’ve seen teams choose UWB because they want “maximum accuracy,” only to discover they don’t need sub-meter precision – or the building can’t support the infrastructure.
How to avoid it:
Start with what needs to be tracked, how precise it really needs to be, and what decisions depend on that data. Then, and only then, evaluate BLE vs UWB vs Wi-Fi. Technology comes last – not first.
Pitfall: Treating indoor maps as a nice-to-have
One client came to us after their IPS showed users in the right room but visually placed them halfway through a wall. Why? Misaligned SVG floorplans.
How to avoid it:
Your map is infrastructure. Rebuild it if needed. Use structured formats (SVG, GeoJSON), apply real-world coordinates, and make it render fast. If the map doesn’t match the physical space, the user will never trust the system – no matter how accurate the backend is.
2. Technical traps (hard to recover from mid-project)
Pitfall: Ignoring signal interference
Signals don’t care about your plans. BLE gets absorbed by people. Wi-Fi bounces off glass. UWB gets blocked by steel racks. We’ve seen “well-planned” deployments collapse in high-traffic warehouses because they weren’t tested under load.
How to avoid it:
Run a physical site survey. Identify signal dead zones and noise sources. Choose the tech that matches your environment, not your preference. Fine-tune transmit power and place anchors where the real-world layout allows them to work – not where it’s convenient.
Pitfall: Underestimating environmental variability
A clean signal in an empty warehouse is irrelevant during peak hours or seasonal humidity shifts. Signal behavior changes with temperature, crowds, and daily patterns.
How to avoid it:
Use systems that adapt in real time. Build in redundancy. Create fallback logic zones. Schedule retesting – not once, but quarterly. The environment changes. Your IPS should too.
Pitfall: Poor handling of floor transitions
Z-axis positioning is hard. Barometric sensors drift. Anchors get misaligned. And suddenly, your user is navigating the wrong floor.
How to avoid it:
Always test vertical transitions. Use floor-specific anchors, visual reset zones (e.g. QR codes near elevators), or zone-based floor logic. If users show up on the wrong level, the entire system becomes unusable.
3. UX & trust failures (the system works, but no one uses it)
Pitfall: Disconnected positioning and UI
Even if indoor tracking is accurate, a laggy or jumpy blue dot kills trust instantly. And once users stop trusting it, they stop using it.
How to avoid it:
Build the UX layer with the positioning system in mind. Real-time rendering, motion smoothing, clear feedback, and positioning confidence indicators. At Volpis, we design the interface and IPS logic together – because users don’t care about accuracy percentages, they care about not getting lost.
4. Operational gaps (everything degrades without this)
Pitfall: Skipping calibration and maintenance
Most IPS systems degrade slowly. Anchors shift. Beacons lose battery. Buildings evolve. Accuracy drops gradually – and no one notices until the system breaks.
How to avoid it:
Make calibration part of your delivery process. Run test loops. Visualize coverage and drift. Create internal tools that track accuracy trends. If you don’t monitor it, it will decay – guaranteed.
Most teams don’t need more sensors. They need better thinking.
If you want IPS to work, start with clarity: What problem are you solving? Where will it break down? What will users see? Then move into the technology, the logic, and the interface – all calibrated to your environment.
We’ve rebuilt IPS rollouts that failed after six figures were already spent. And we’ve launched systems in weeks that just worked – because the fundamentals were right.
That’s the difference between implementing a feature… and delivering a system that works in the real world.
Top trends in indoor positioning technology (2026)

These aren’t just buzzwords. They’re the shifts that are actively reshaping how businesses deploy, scale, and extract value from indoor positioning systems.
Trend 1: AI & ML for smarter accuracy
According to Albert Sabban’s study “Innovations in Indoor Positioning Systems (IPS)”, Artificial intelligence and machine learning are no longer experimental add-ons – they’re becoming core to how IPS systems function.
Instead of relying solely on static signal maps or simple trilateration, modern systems now train on real-world usage data to improve over time.
They adapt to signal interference, floor layout changes, and even user movement patterns – delivering more accurate and reliable positioning in chaotic, multi-floor environments.
Practical outcomes:
- Reduced calibration time.
- Higher precision in noisy spaces (e.g., warehouses with metal racks).
- Predictive pathing for smarter routing and alerts.
Trend 2: Sensor fusion (beyond just BLE)
Relying on a single signal source is no longer enough – especially in buildings with mixed materials and signal dead zones.
Sensor fusion combines multiple data inputs – Bluetooth, UWB, Wi-Fi RTT, IMU (gyroscope + accelerometer), barometer, and even magnetic field anomalies – into a single positioning layer.
This hybrid approach drastically improves accuracy, even when some signal types are weak or missing.
Use cases:
- Smoother indoor navigation across floors and staircases.
- Positioning continuity in signal-loss zones (elevators, stairwells).
- Better orientation tracking (e.g., knowing direction a person is facing).
Trend 3: Device-free tracking
In many scenarios – from hospital patients to warehouse carts – requiring a smartphone app isn’t practical.
2026 sees growing adoption of device-free positioning, using passive tags (UWB, BLE), wearables, or computer vision to locate people or assets without a smartphone or active interaction.
This shift enables:
- Real-time visibility for non-app users (patients, visitors, staff).
- Smarter asset management (trolleys, equipment, packages).
- Compliance tracking in sensitive zones (labs, logistics, security areas).
Trend 4: Vertical specialization
The era of one-size-fits-all IPS is over.
Vendors are now delivering tailored solutions optimized for specific industries, workflows, and pain points.
Examples:
- Healthcare: Patient flow, staff location, emergency response.
- Retail: Dwell time analytics, in-store navigation, queue monitoring.
- Logistics: Forklift tracking, zone-based task automation.
- Airports: Multi-terminal wayfinding, real-time crowd density heatmaps.
This trend leads to faster ROI and deeper operational integration, because systems are built around real-world problems – not generic feature sets. For a deeper dive into what’s shaping the IPS landscape, check out our article on indoor navigation trends.
When to build in-house vs hire indoor positioning company
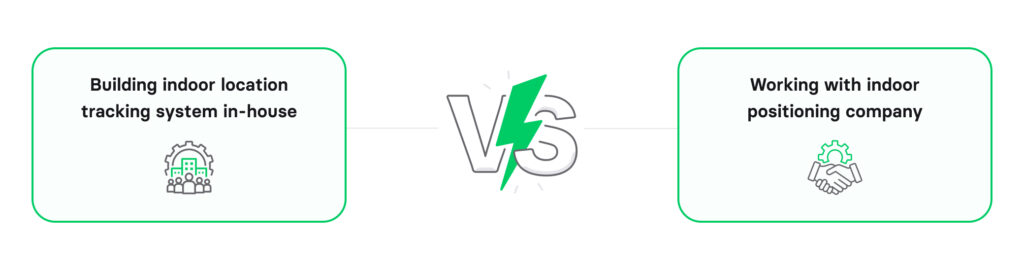
Building an indoor positioning system is not just about algorithms. It requires reliable infrastructure, software integration, and – most importantly – on-site testing inside the actual venue. That raises a key decision: should you develop everything in-house, or work with a partner?
Building indoor location tracking system in-house
Going fully in-house can make sense if:
- You already have engineers with experience in positioning, mobile, and backend systems.
- IPS is core to your product and you want full control over the technology stack.
- Your team can handle repeated on-site testing and calibration without external support.
This path offers control, but it also demands significant resources. Even strong teams often underestimate how unpredictable real buildings can be. Concrete, glass, metal, elevators, and human traffic all distort signals. Without structured testing and iteration, accuracy quickly falls short of expectations.
Working with indoor positioning company
For most businesses, partnering with indoor positioning company is the more practical path. IPS is rarely just about positioning – it usually needs to be integrated into software:
- Indoor maps.
- Mobile apps or SDKs.
- Backend systems for storing and analyzing movement data.
- Navigation features such as routing or alerts.
At Volpis, our role is to design and deliver the software layer: from positioning algorithms to app integration. We also guide your team on the infrastructure side – providing clear instructions on where to place devices, how to validate coverage, and how to collect logs during testing.
The physical installation itself – placing beacons or UWB anchors, running site walks, maintaining hardware – is usually handled on the client side, since you have direct access to the venue. What makes the system reliable is the collaboration: we provide the architecture and logic, and your team ensures it’s tested in the real-world environment.
Let’s bring your indoor positioning system idea to life
Regularly ranked among the Top Custom Software Development Companies on Clutch, Volpis specialize in building indoor systems end-to-end – from selecting the right IPS technology and setting up hardware, to implementing backend infrastructure and integrating your solution into a full-scale indoor navigation platform.
Our team has delivered IPS and indoor navigation projects across industries like logistics, healthcare, retail, and manufacturing – always tailored to unique use cases like asset tracking, staff coordination, or customer wayfinding.
One of our most complex projects (under NDA) involved a large-scale indoor positioning and warehouse navigation solution integrated with a warehouse management system. It’s now in use by a major logistics and manufacturing enterprise – showcasing our ability to handle enterprise-grade accuracy, real-time updates, and scalable backend logic.
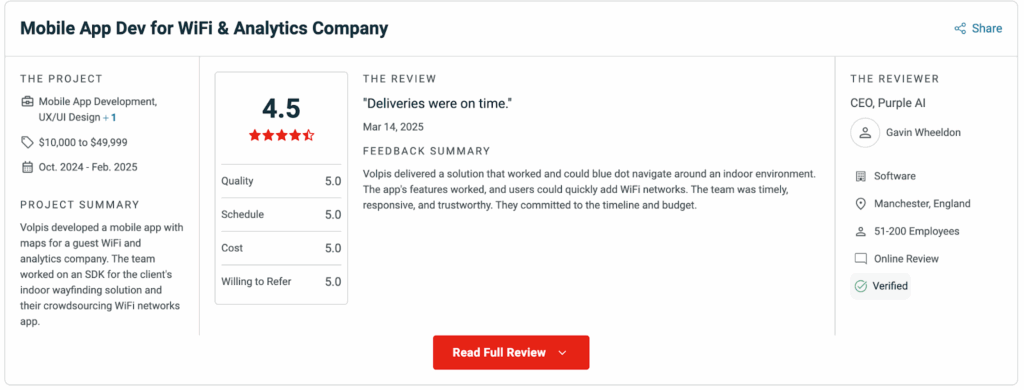
We’ve also partnered with Purple AI, a global leader in indoor wayfinding and Wi-Fi analytics. Our team supported them with SDK development and built a mobile app for Wi-Fi-based crowdsourced positioning, enabling a highly accurate “blue dot” experience. Their CEO, Gavin Wheeldon, highlighted our work in a Clutch review.
Whether you need an indoor positioning system for a shopping mall, airport, or office building, we tailor its features to fit all your expectations. Volpis specializes in delivering complete indoor location services tailored to real-world business needs.
Have an IPS project in mind? Contact Volpis today via info@volpis.com.
Questions & Answers
FAQ
How long does it typically take to build an indoor positioning system from scratch?
Building an indoor positioning system (IPS) can take anywhere from 6 months for a basic system to 12 months or more for a complex solution, depending on factors like the system’s accuracy requirements, number of floors, and building size.
What kind of maintenance is required for an IPS once it’s operational?
Maintenance involves regular calibration of sensors, replacing beacon batteries, updating software, and checking for signal interference. Regular testing is recommended to ensure ongoing accuracy, especially in high-traffic or changing environments.
Are there privacy or legal concerns when tracking people indoors?
Yes, privacy laws like GDPR require user consent before tracking their location. It’s essential to inform users about data collection practices, ensure data is anonymized when possible, and secure data to protect user privacy.
What is the lifespan of hardware like beacons and sensors in an IPS?
The lifespan of beacons and sensors varies. Battery-powered Bluetooth beacons typically last 1-3 years before needing a battery replacement, while more robust hardware, like Wi-Fi access points or UWB anchors, may last 5-10 years with proper maintenance.
Can IPS work without a constant Internet connection?
Yes, an IPS can work offline, especially for static location tracking. However, features like real-time updates, data analytics, and remote monitoring require periodic or constant internet connectivity.
How accurate is an indoor positioning system compared to GPS?
IPS can achieve high accuracy, often within a few meters or even centimeters with technologies like UWB. However, GPS is generally more accurate outdoors. IPS accuracy varies based on the technology used and environmental factors like wall material or signal interference.
How adaptable is an IPS if the layout of a building changes?
IPS can adapt to layout changes if the system allows for easy updating of digital maps. Many systems offer CMS-based tools to reconfigure maps and beacon placements, which can be adjusted as needed to reflect layout changes.
What are the ongoing costs associated with operating an IPS?
Ongoing costs may include software licensing, hardware replacements, battery costs for beacons, and system recalibration. Annual maintenance can be around 10-20% of the system’s initial installation cost.
How can I ensure that the IPS works well in high-traffic areas?
For high-traffic areas, consider using technologies less affected by interference, like UWB or VLC. Additionally, increasing the density of beacons or anchors can improve accuracy and reliability.
Can IPS data be integrated with other business systems, like inventory management or emergency alerts?
Yes, IPS data can be integrated with other systems through APIs. This is useful for applications like inventory management, security alerts, and visitor tracking, enhancing overall business operations and providing more value.